意味が分からないエラー

Introduction

掲題の通りなんですが、情報が少ないんですよ。
問題は、iOSのクロスプラットフォームC++ライブラリをVisual Studioからビルドする際のエラー。

Xamarinの場合はMacホストと接続できていないよ、って教えてくれるのですが、そんな便利機能、流石C++。あるわけない。

それで何とか見つけたのが公式。
公式が役立つのはかなり久しぶりな気がします。

How to do?

要するにビルド環境、つまりMacにつながらないよって、エラーなのですが… プロジェクトの設定ではなく、Visual Studio全体のオプションに答えがあります。

上のオプションで設定できるのですが、まずはMac側で設定が必要です。

1. vcremoteのインストール

ここに書いてあるのが、なんとNode.jsが必要。しかもバージョンが指定されている徹底ぶり。
ここは素直に従うべきです。ただでさえ意味不明なエラーが多いiOSのクロスプラットフォームライブラリ作成。
余計なことはしないほうが無難です。

Node.js version 12.14.1 and npm version 6.13.4 Install version 12.14.1 of Node.js on your Mac. If you install the Node.js package, it should come with npm version 6.13.4. Other versions of Node.js and npm may not support some modules used in the remote agent vcremote, which can cause vcremote installation to fail. We recommend you install Node.js by using a package manager such as Node Version Manager. Avoid using the command sudo to install Node.js, as some modules can fail to install when using sudo.

なので

  • Node.jsは12.14.1
  • npmは6.13.4
  • nvm推奨
  • sudoは使うな ** Homebrew** は注意

を守って環境を作ります。

1-1. nvm

公式のバージョンを調べます。

最新は2020/05/30時点でv0.35.3になります。
これを利用してMacにビルドに使うユーザでログインし、下記でインストールします。

1
2
3
4
5
6
7
8
9
10
11
12
13
14
15
16
17
18
19
20
21
$ curl -o- https://raw.githubusercontent.com/creationix/nvm/v0.35.3/install.sh | bash
% Total % Received % Xferd Average Speed Time Time Time Current
Dload Upload Total Spent Left Speed
100 13527 100 13527 0 0 6472 0 0:00:02 0:00:02 --:--:-- 6475
=> Downloading nvm from git to '/Users/t-takeuchi/.nvm'
=> Cloning into '/Users/t-takeuchi/.nvm'...
remote: Enumerating objects: 290, done.
remote: Counting objects: 100% (290/290), done.
remote: Compressing objects: 100% (257/257), done.
remote: Total 290 (delta 35), reused 97 (delta 20), pack-reused 0
Receiving objects: 100% (290/290), 163.27 KiB | 530.00 KiB/s, done.
Resolving deltas: 100% (35/35), done.
=> Compressing and cleaning up git repository

=> Appending nvm source string to /Users/t-takeuchi/.bashrc
=> Appending bash_completion source string to /Users/t-takeuchi/.bashrc
=> Close and reopen your terminal to start using nvm or run the following to use it now:

export NVM_DIR="$HOME/.nvm"
[ -s "$NVM_DIR/nvm.sh" ] && \. "$NVM_DIR/nvm.sh" # This loads nvm
[ -s "$NVM_DIR/bash_completion" ] && \. "$NVM_DIR/bash_completion" # This loads nvm bash_completion

インストールが完了すると .bash_profile に追加されます。
環境変数を反映させインストール出来ているかをチェックします。

1
2
3
$ source .bash_profile
$ nvm --version
0.35.3

1-2. Node.js

nvmが入ったので、サクサクインストールします。

1
2
3
4
5
6
7
8
9
10
$ nvm install v12.14.1
Downloading and installing node v12.14.1...
Downloading https://nodejs.org/dist/v12.14.1/node-v12.14.1-darwin-x64.tar.xz...
######################################################################################################################################################## 100.0%
Computing checksum with shasum -a 256
Checksums matched!
Now using node v12.14.1 (npm v6.13.4)
Creating default alias: default -> v12.14.1
$ nvm use v12.14.1
Now using node v12.14.1 (npm v6.13.4)

これで、npmも指定されたバージョンがインストールされます。

1-3. remote agent

目的のブツです。

1
2
3
4
5
6
7
8
9
10
11
12
13
14
15
$ npm install -g --unsafe-perm vcremote
npm WARN deprecated request@2.88.0: request has been deprecated, see https://github.com/request/request/issues/3142
npm WARN deprecated node-uuid@1.4.8: Use uuid module instead
npm WARN deprecated mkdirp@0.5.1: Legacy versions of mkdirp are no longer supported. Please update to mkdirp 1.x. (Note that the API surface has changed to use Promises in 1.x.)
npm WARN deprecated sprintf@0.1.5: The sprintf package is deprecated in favor of sprintf-js.

..

> node-ios-device@1.7.1 install /Users/t-takeuchi/.nvm/versions/node/v12.14.1/lib/node_modules/vcremote/node_modules/ioslib/node_modules/node-ios-device
> node ./bin/run.js node-pre-gyp install --fallback-to-build

node-pre-gyp WARN Using request for node-pre-gyp https download
[node-ios-device] Success: "/Users/t-takeuchi/.nvm/versions/node/v12.14.1/lib/node_modules/vcremote/node_modules/ioslib/node_modules/node-ios-device/binding/node-v72-darwin-x64/node_ios_device.node" is installed via remote
+ vcremote@1.0.16
added 390 packages from 246 contributors in 52.322s

2. vcremote設定

vcremoteを起動します。初回起動時に色々インストールされます。
Xcode 11.5がインストールされるので少し時間がかかります。

1
2
3
4
5
6
7
8
9
10
11
12
13
14
15
16
17
18
19
20
21
22
23
24
25
26
27
28
29
30
31
$ vcremote
vcremote
Copyright (C) 2014 Microsoft Corporation. All rights reserved.
1.0.16

Configuring first-run dependencies.
To deploy to physical iOS devices, or to debug a device or simulator, we need some packages from Homebrew.
Installing Homebrew may ask you for an admin password. Do you want to continue?
[y]/n? y
Warning: The Ruby Homebrew installer is now deprecated and has been rewritten in
Bash. Please migrate to the following command:
/bin/bash -c "$(curl -fsSL https://raw.githubusercontent.com/Homebrew/install/master/install.sh)"

..


Successfully installed homebrew packages.

VC build library initialized.
Verifying lldb-mi for debugging is installed under path: /Users/t-takeuchi/.nvm/versions/node/v12.14.1/lib/node_modules/vcremote/node_modules/vcremote-lib/debugger
lldb-mi is installed.
Use the following information under Tools, Options, Cross Platform, iOS, then press Pair:

Host Name: MacOS.local
Port: 3030
Secure: [x]
Pin: 190888
The security PIN is for one-time use and expires in 10 minutes. To generate additional PINs, use the following command:
vcremote generateClientCert

Remote build server listening on [https] port 3030

最後に出力された、

  • Port
  • Secure
  • Pin

をVisaul Studioに10分以内に入力します。
ツール(T) - オプション(O) からクロス プラットフォーム - C++ - iOS - ペアリングを選択し、下記に上述の値を設定します。
リモートルートはログインユーザのvcremoteのパスを指定します。

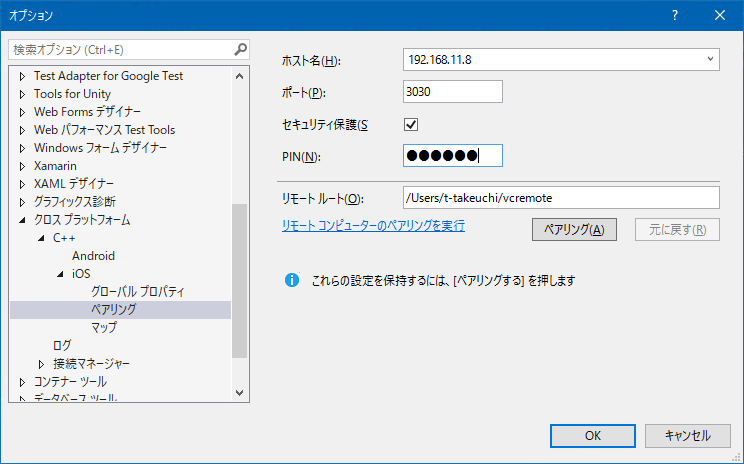
入力後、ペアリングを押下すると正常に接続されたことを示すメッセージが出力されます。

3. ビルド

この状態でiOSのC++プロジェクトをビルドすることが出来るようになりますが、ここで問題が。
ビルドに失敗してログに下記のメッセージが出力されている場合があります。

1
xcode-select: error: tool 'xcodebuild' requires Xcode, but active developer directory '/Library/Developer/CommandLineTools' is a command line tools instance

この場合はMacのGUIにログインし、Xcodeを起動させ、設定画面のLocationsを開きます。

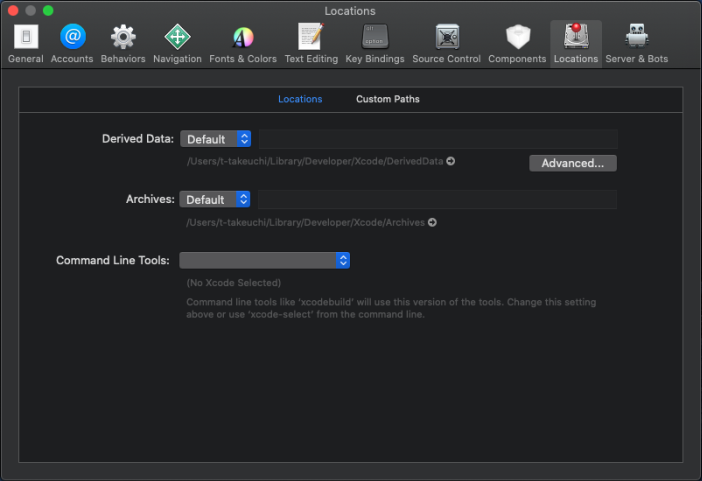
Command Line Toolsが空になっているので最新のXcodeを選択しXcodeを終了します。
この状態で念のため、vcremoteを終了し再度起動します。
初回起動以降はペアリングが済んでいれば、何も表示されずすぐに起動されます。
起動後、Visual Studioからビルドすると無事に成功するはずです。

4. 出力先はどこ?

出力されるはずのバイナリはWindows側ではなくMac側に出力されます。
具体的な場所はビルドログを見るとわかります。
または出力先に*.recipeファイルがありますので、それをテキストファイルで開きます。

1
2
3
4
<?xml version="1.0" encoding="utf-8"?>
<project>
<BuiltOutputs>/Users/t-takeuchi/vcremote/D/Works/Lib/lothrop/XamarinNative/x64/Debug/libStaticLibrary1.a</BuiltOutputs>
</project>

BuiltOutputs に記載されています。