Introduction

忘備録。
Windows Subsystem for Linux Version 2 に構築したサーバーに外部からアクセスできず困っていた。
ググってみれば、いろいろ答えは書いてあったが、ファイヤーウォール解除、ポート転送の許可など、何をやってもうまくいかなかったため自宅で検証。

How to resolve?

一度ゼロから Windows 10 内に下記 Hyper-V マシンを構築。

1
2
3
4
エディション	Windows 11 Pro
バージョン 23H2
OS ビルド 22631.3007
エクスペリエンス Windows Feature Experience Pack 1000.22681.1000.0

1. WSL のインストール

仮想マシン内に WSL をインストールしていく。

1
2
3
4
5
6
7
8
$ wsl --install
インストール中: 仮想マシン プラットフォーム
仮想マシン プラットフォーム はインストールされました。
インストール中: Linux 用 Windows サブシステム
Linux 用 Windows サブシステム はインストールされました。
インストール中: Ubuntu
Ubuntu はインストールされました。
要求された操作は正常に終了しました。変更を有効にするには、システムを再起動する必要があります。

再起動後、自動でシェルが立ち上がり、デフォルトでインストールされた Ubuntu の設定が始まる。

1
2
3
4
5
6
7
8
9
10
11
12
13
14
15
16
17
18
19
20
21
22
Ubuntu は既にインストールされています。
Ubuntu を起動しています...
Installing, this may take a few minutes...
Please create a default UNIX user account. The username does not need to match your Windows username.
For more information visit: https://aka.ms/wslusers
Enter new UNIX username: <ユーザ名>
New password:
Retype new password:
passwd: password updated successfully
Installation successful!
To run a command as administrator (user "root"), use "sudo <command>".
See "man sudo_root" for details.

Welcome to Ubuntu 22.04.3 LTS (GNU/Linux 5.15.133.1-microsoft-standard-WSL2 x86_64)

* Documentation: https://help.ubuntu.com
* Management: https://landscape.canonical.com
* Support: https://ubuntu.com/advantage


This message is shown once a day. To disable it please create the
/home/<ユーザ名>/.hushlogin file.

ちなみに、再起動後下記のようなメッセージなった場合は、 Nested Virtualization が無効になっている状態で Hyper-V の中で WSL をインストールしたことを意味している。

1
2
3
4
5
6
7
Ubuntu は既にインストールされています。
Ubuntu を起動しています...
Installing, this may take a few minutes...
WslRegisterDistribution failed with error: 0x80370102
Please enable the Virtual Machine Platform Windows feature and ensure virtualization is enabled in the BIOS.
For information please visit https://aka.ms/enablevirtualization
Press any key to continue...

そのため、仮想マシンをシャットダウン、ホストマシンに戻り、下記を実行。

1
Set-VMProcessor -VMName <VMName> -ExposeVirtualizationExtensions $true

再度、仮想マシンを立ち上げ、wsl --install を実行することで前述の Ubuntu の設定が再開される。

2. サーバーの用意

WSL にサーバーアプリケーションを構築する。
ポート転送が動作するかを検証したいだけなので、何でもいい。

ここでは cockpit をインストール。
WSL 起動後、下記でインストール可能。

1
2
3
$ sudo apt update
$ sudo apt install -y cockpit
$ sudo systemctl enable cockpit.socket --now

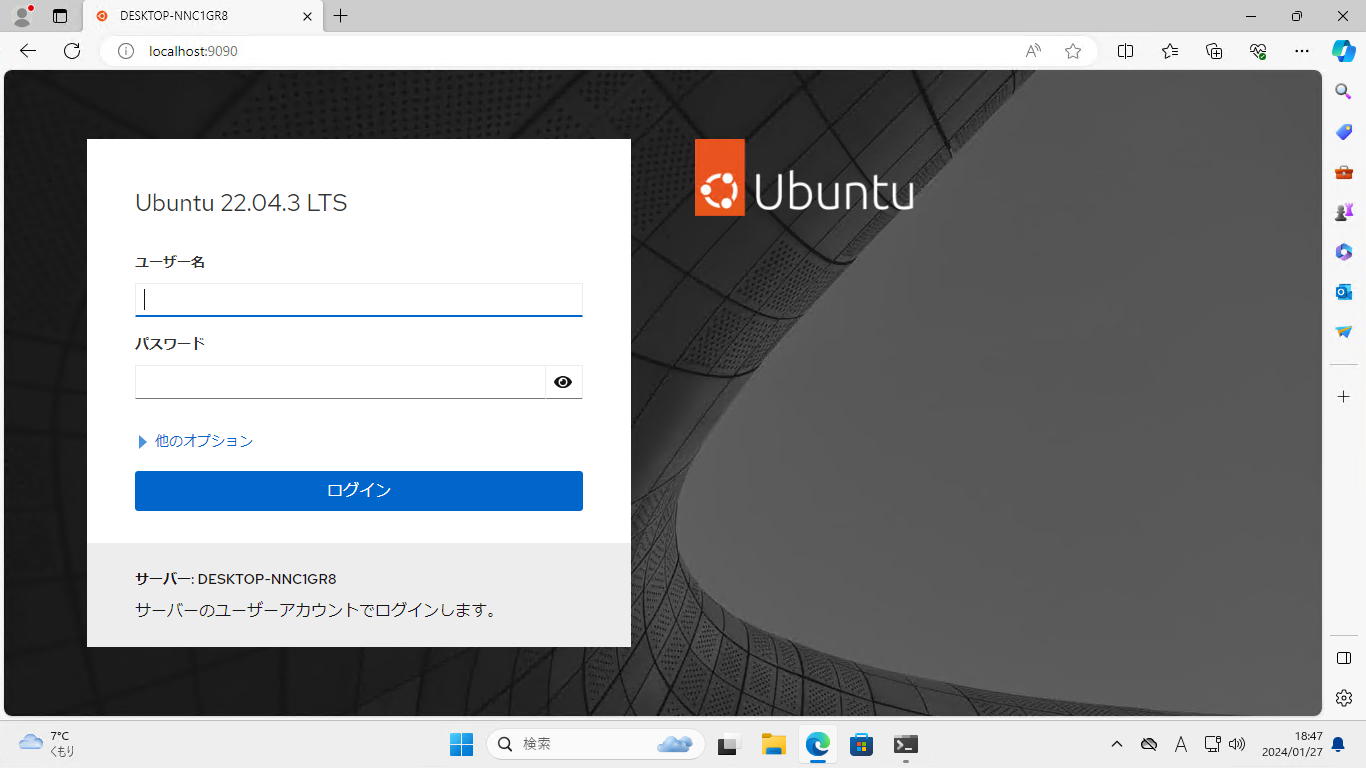
WSL のホストマシンからブラウザを立ち上げ、 http://localhost:9090 にアクセスすると無事に WSL 内の Cockpit にアクセスできる。

cockpit

ここまでは特に問題なかった。

3. ネットワーク構成

構築した環境におけるネットワークは下記の状態になっている。

1
2
3
4
5
6
7
8
9
10
11
12
13
14
15
16
17
18
19
20
21
22
23
24
25
26
27
28
29
30
31
32
33
34
┌────────────────────────────────────────────┐
│ Host ┌──────────────────┐ │
│ (Windows 10) │ IF │ │
│ │ 192.168.11.21 │ │
│ └───────┬─▲────────┘ │
│ │ │ │
│ ┌───────▼─┴────────┐ │
│ │ default switch │ │
│ │ 172.30.80.1 │ │
│ └───────┬─▲────────┘ │
│ │ │ │
│ ┌─────────────────────┼─┼──────────────┐ │
│ │ Hyper-V ┌───────▼─┴────────┐ │ │
│ │ (Windows 11)│ IF │ │ │
│ │ │ 172.30.90.62 │ │ │
│ │ └───────┬─▲────────┘ │ │
│ │ │ │ │ │
│ │ ┌───────▼─┴────────┐ │ │
│ │ │ vEthernet (WSL) │ │ │
│ │ │ 172.17.192.1 │ │ │
│ │ └───────┬─▲────────┘ │ │
│ │ │ │ │ │
│ │ ┌───────────────────┼─┼───────────┐ │ │
│ │ │ WSL2 ┌───────▼─┴────────┐ │ │ │
│ │ │ (Linux) │ IF │ │ │ │
│ │ │ │ 172.17.207.238 │ │ │ │
│ │ │ └───────┬─▲────────┘ │ │ │
│ │ │ │ │ │ │ │
│ │ │ ┌───────▼─┴───────┐ │ │ │
│ │ │ │ Cockpit:9090 │ │ │ │
│ │ │ └─────────────────┘ │ │ │
│ │ └─────────────────────────────────┘ │ │
│ └──────────────────────────────────────┘ │
└────────────────────────────────────────────┘

WSL のホストマシンである Hyper-V から、localhost 宛の通信は適切に WSL 側に転送されるため、先のように問題なくブラウザで表示することができた。
(localhost ではなく vEthernet (WSL) のアドレスを指定してもよい。つまり http://172.17.192.1:9090 でも Cockpit を表示できる)

これについては、 Microsoft LearnWindows からの Linux ネットワーク アプリへのアクセス (localhost) に明記してある。

やりたいのは、WSL のホストマシンの外部マシン (今回の場合は Windows 10) から、WSL 内のサーバー アプリケーションへのアクセスである。

4. ファイヤーウォールとポート転送

Windows 10 から、WSL 内で起動している Cockpit へアクセスするためには

  • Hyper-V (Windows 11) のファイヤーウォール設定変更 (9090 へのインバウンド)
  • Hyper-V (Windows 11) 宛の通信を WSL へポート転送

が必要になる。

これらを一括で実施するのが下記の Powershell スクリプト (port-forward.ps1)

1
2
3
4
5
6
7
8
9
10
11
12
13
14
15
16
17
18
19
20
21
22
23
24
25
26
27
28
29
30
31
32
33
34
35
36
37
38
39
40
# Set port numbers to be allowed
$ports = @(
22
9090
);
# Set firewall name
$firewallName = "WSL 2 Firewall"

# Check whether current user has privilege
if (!([Security.Principal.WindowsPrincipal][Security.Principal.WindowsIdentity]::GetCurrent()).IsInRole("Administrators"))
{
Start-Process powershell.exe "-File `"$PSCommandPath`"" -Verb RunAs;
exit;
}

# Retrieve ip address of WSL2
$ip = bash.exe -c "ip r |tail -n1|cut -d ' ' -f9"
if( ! $ip )
{
echo "The Script Exited, the ip address of WSL 2 cannot be found";
exit;
}

$localPorts = $ports -join ",";

# Remove previous firewall rule
iex "Remove-NetFireWallRule -DisplayName '${firewallName}' ";

# Add firewall for inbound
iex "New-NetFireWallRule -DisplayName '${firewallName}' -Direction Inbound -LocalPort $localPorts -Action Allow -Protocol TCP";

# Set port forward
for ($i = 0; $i -lt $ports.length; $i++)
{
$port = $ports[$i];
iex "netsh interface portproxy add v4tov4 listenport=$port listenaddress=* connectport=$port connectaddress=$ip";
}

# Show port forward list
iex "netsh interface portproxy show v4tov4";

上記の管理者権限をつけて立ち上げたコマンドプロンプトから実行。

1
2
3
4
5
6
7
8
9
10
11
12
13
14
15
16
17
18
19
20
21
22
23
24
25
26
27
28
29
30
31
32
33
34
35
36
37
38
39
40
41
42
$ powershell.exe -ExecutionPolicy Bypass -File .\port-forward.ps1
Remove-NetFireWallRule : プロパティ 'DisplayName' が 'WSL 2 Firewall' の MSFT_NetFirewallRule オブジェクトが見つかりま
せん。プロパティの値を確認してから再試行してください。
発生場所 行:1 文字:1
+ Remove-NetFireWallRule -DisplayName 'WSL 2 Firewall'
+ ~~~~~~~~~~~~~~~~~~~~~~~~~~~~~~~~~~~~~~~~~~~~~~~~~~~~
+ CategoryInfo : ObjectNotFound: (WSL 2 Firewall:String) [Remove-NetFirewallRule], CimJobException
+ FullyQualifiedErrorId : CmdletizationQuery_NotFound_DisplayName,Remove-NetFirewallRule


Name : {c4b25102-2bd5-4abb-950f-ab36778fbe20}
DisplayName : WSL 2 Firewall
Description :
DisplayGroup :
Group :
Enabled : True
Profile : Any
Platform : {}
Direction : Inbound
Action : Allow
EdgeTraversalPolicy : Block
LooseSourceMapping : False
LocalOnlyMapping : False
Owner :
PrimaryStatus : OK
Status : 規則は、ストアから正常に解析されました。 (65536)
EnforcementStatus : NotApplicable
PolicyStoreSource : PersistentStore
PolicyStoreSourceType : Local
RemoteDynamicKeywordAddresses : {}
PolicyAppId :


ipv4 をリッスンする: ipv4 に接続する:

Address Port Address Port
--------------- ---------- --------------- ----------
* 22 172.17.207.238 22
* 9090 172.17.207.238 9090

WSL のアドレスを自動で調べて、ポート転送設定を行ってくれる。

Windows 10 のブラウザから、Hyper-V のアドレス (172.30.90.62) を指定して、WSL 内の Cockpit にアクセスできることが確認できる。

cockpit