前回の続き。

Experimentation

1. UISegmentedControl

まずは、MonoTouch.UIKit.UISegmentedControlを追加します。
これは .NET でいう System.Windows.Forms.TabControl になります。

1
2
3
4
5
6
7
8
9
10
11
12
13
14
15
16
17
18
19
20
21
22
23
24
25
26
27
28
29
30
31
32
33
34
35
36
37
38
39
40
41
42
43
44
45
46
47
48
49
50
51
52
53
54
55
56
57
58
59
60
61
62
63
64
65
66
67
68
69
70
71
72
73
public class MyViewController : UIViewController
{
UIButton button;
UISegmentedControl segmentedControl; // ADD
int numClicks = 0;
float segmentedControlWidth = 200; // ADD
float buttonWidth = 200;
float buttonHeight = 50;

public MyViewController()
{
}

public override void ViewDidLoad()
{
base.ViewDidLoad();

View.Frame = UIScreen.MainScreen.Bounds;
View.BackgroundColor = UIColor.Black; // MOD
View.AutoresizingMask = UIViewAutoresizing.FlexibleWidth | UIViewAutoresizing.FlexibleHeight;

button = UIButton.FromType(UIButtonType.RoundedRect);

button.Frame = new RectangleF(
View.Frame.Width / 2 - buttonWidth / 2,
View.Frame.Height / 2 - buttonHeight / 2,
buttonWidth,
buttonHeight);

button.BackgroundColor = UIColor.White;
button.SetTitle("Click me", UIControlState.Normal);

button.TouchUpInside += (object sender, EventArgs e) =>
{
button.SetTitle(String.Format("clicked {0} times", numClicks++), UIControlState.Normal);
};

button.AutoresizingMask = UIViewAutoresizing.FlexibleWidth | UIViewAutoresizing.FlexibleTopMargin |
UIViewAutoresizing.FlexibleBottomMargin;

View.AddSubview(button);

// ADD
string[] array = { "Left", "Center", "Right" };
segmentedControl = new UISegmentedControl(array);

segmentedControl.Frame = new RectangleF(
View.Frame.Width / 2 - segmentedControlWidth / 2,
button.Frame.Bottom + 10,
segmentedControlWidth,
buttonHeight);

segmentedControl.ValueChanged += (sender, args) =>
{
var index = segmentedControl.SelectedSegment;
if (!(0 <= index && index < array.Length))
{
return;
}

using (var alert = new UIAlertView("Confirm", array[index], null, "OK", null))
{
alert.Show();
}
};

segmentedControl.AutoresizingMask = UIViewAutoresizing.FlexibleWidth | UIViewAutoresizing.FlexibleTopMargin |
UIViewAutoresizing.FlexibleBottomMargin;

View.AddSubview(segmentedControl);
}

}

ボタンの上にUISegmentedControlが追加されました。
ビルド実行するとこうなります。

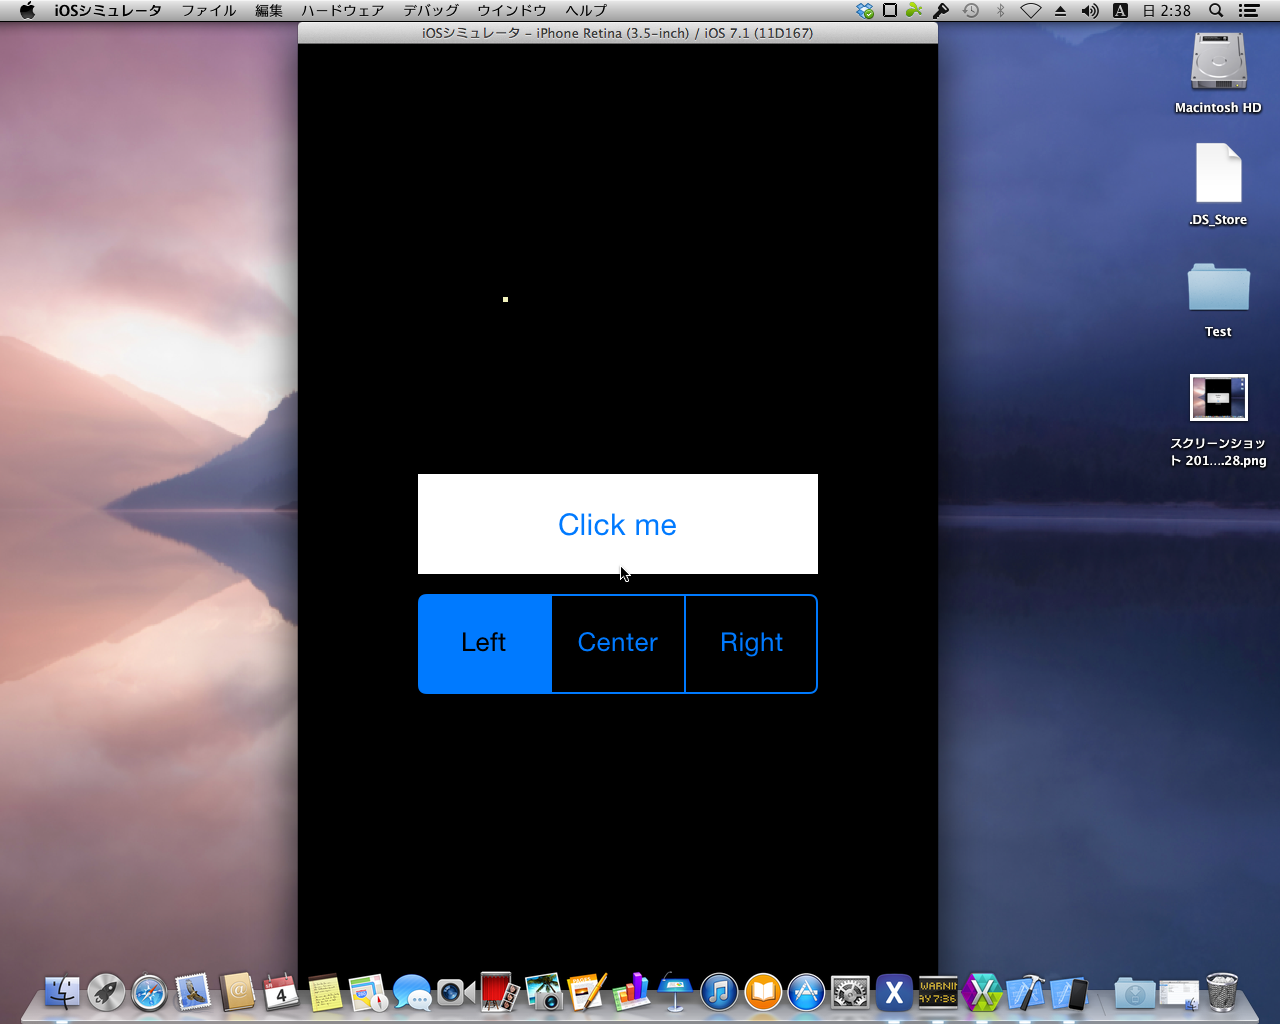
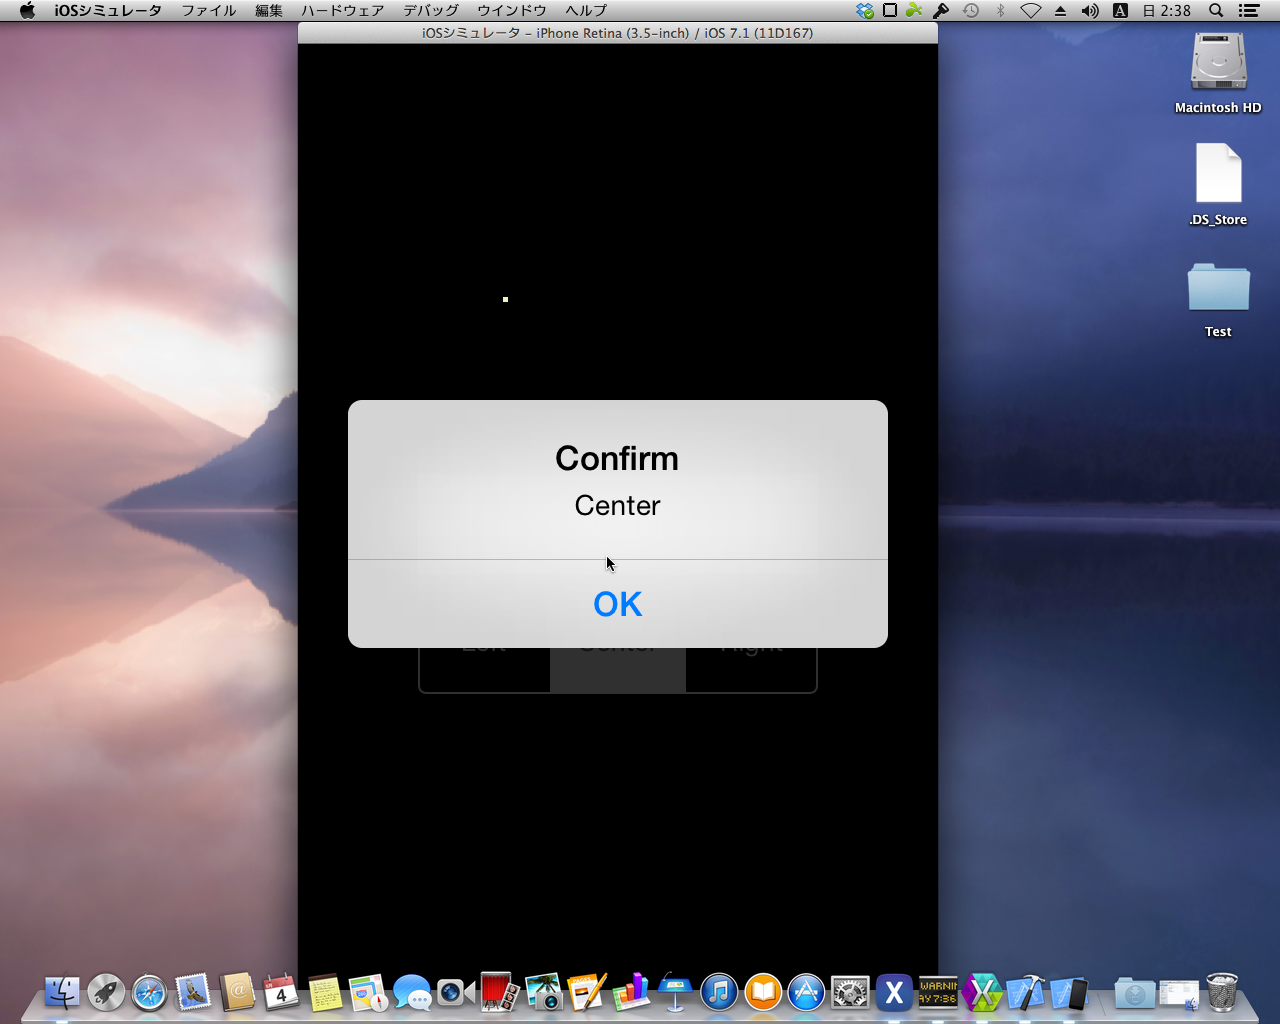
Left,Center,Rightの領域をタップすると、その項目の文字列がアラートビューで表示されます。

2. UIDatePicker

次はMonoTouch.UIKit.UIDatePickerを追加します。
これは .NET でいう System.Windows.Forms.MonthCalendarです。
ただし、表示スタイルに、下記のモードが用意されています。

  • UIDatePickerModeDateAndTime:月日時分
  • UIDatePickerModeDate:年月日
  • UIDatePickerModeTime:時分
  • UIDatePickerModeCountDownTimer:カウントダウン

サンプルを修正します。

1
2
3
4
5
6
7
8
9
10
11
12
13
14
15
16
17
18
19
20
21
22
23
24
25
26
27
28
29
30
31
32
33
34
35
36
37
38
39
40
41
42
43
44
45
46
47
48
49
50
51
52
53
54
55
56
57
58
59
60
61
62
63
64
65
66
67
68
69
70
71
72
73
74
75
76
77
78
79
80
81
82
83
84
85
86
87
88
89
90
91
92
93
public class MyViewController : UIViewController
{
UIButton button;
UIButton doneButton; // ADD
UIActionSheet actionSheet; // ADD
UIDatePicker datePicker; // ADD
int numClicks = 0;
float buttonWidth = 200;
float buttonHeight = 50;
float barHeight = 50; // ADD

public MyViewController()
{
}

public override void ViewDidLoad()
{
base.ViewDidLoad();

View.Frame = UIScreen.MainScreen.Bounds;
View.BackgroundColor = UIColor.Black; // MOD
View.AutoresizingMask = UIViewAutoresizing.FlexibleWidth | UIViewAutoresizing.FlexibleHeight;

button = UIButton.FromType(UIButtonType.RoundedRect);

button.Frame = new RectangleF(
View.Frame.Width / 2 - buttonWidth / 2,
View.Frame.Height / 2 - buttonHeight / 2,
buttonWidth,
buttonHeight);

button.BackgroundColor = UIColor.White;
button.SetTitle("Click me", UIControlState.Normal);

button.TouchUpInside += (object sender, EventArgs e) =>
{
//button.SetTitle(String.Format("clicked {0} times", numClicks++), UIControlState.Normal); // DEL

// ADD
actionSheet.ShowInView(View);

var actionSheetSize = new SizeF(View.Frame.Width, datePicker.Frame.Height + barHeight);
var actionSheetFrame = new RectangleF(0, View.Frame.Height - actionSheetSize.Height, actionSheetSize.Width, actionSheetSize.Height);
actionSheet.Frame = actionSheetFrame;

datePicker.Frame = new RectangleF
(datePicker.Frame.X, barHeight, datePicker.Frame.Width, datePicker.Frame.Height);

var doneButtonSize = new SizeF(71, 30);
doneButton.Frame = new RectangleF(actionSheetSize.Width - doneButtonSize.Width - 10, 7, doneButtonSize.Width, doneButtonSize.Height);
};

button.AutoresizingMask = UIViewAutoresizing.FlexibleWidth | UIViewAutoresizing.FlexibleTopMargin |
UIViewAutoresizing.FlexibleBottomMargin;

View.AddSubview(button);

// ADD
actionSheet = new UIActionSheet();
actionSheet.Style = UIActionSheetStyle.BlackTranslucent;

datePicker = new UIDatePicker();
datePicker.Frame = new RectangleF(
View.Frame.Width / 2 - buttonWidth / 2,
button.Frame.Bottom + 10,
buttonWidth,
buttonHeight);
datePicker.AutoresizingMask = UIViewAutoresizing.FlexibleWidth | UIViewAutoresizing.FlexibleTopMargin |
UIViewAutoresizing.FlexibleBottomMargin;

doneButton = UIButton.FromType(UIButtonType.RoundedRect);
doneButton.SetTitle("Done", UIControlState.Normal);
doneButton.TouchUpInside += (s, e) =>
{
actionSheet.DismissWithClickedButtonIndex(0, true);

// NSDate to DateTime
var date = datePicker.Date;
var baseDate = new DateTime(2001, 1, 1, 0, 0, 0, DateTimeKind.Utc);
var dateTime = baseDate.AddSeconds(date.SecondsSinceReferenceDate);
dateTime = dateTime.ToLocalTime();

using (var alert = new UIAlertView("Confirm", dateTime.ToString(), null, "OK", null))
{
alert.Show();
}
};

actionSheet.AddSubview(doneButton);
actionSheet.AddSubview(datePicker);
}

}

ビルドして、ボタンを押下すると、日時を選択できます。

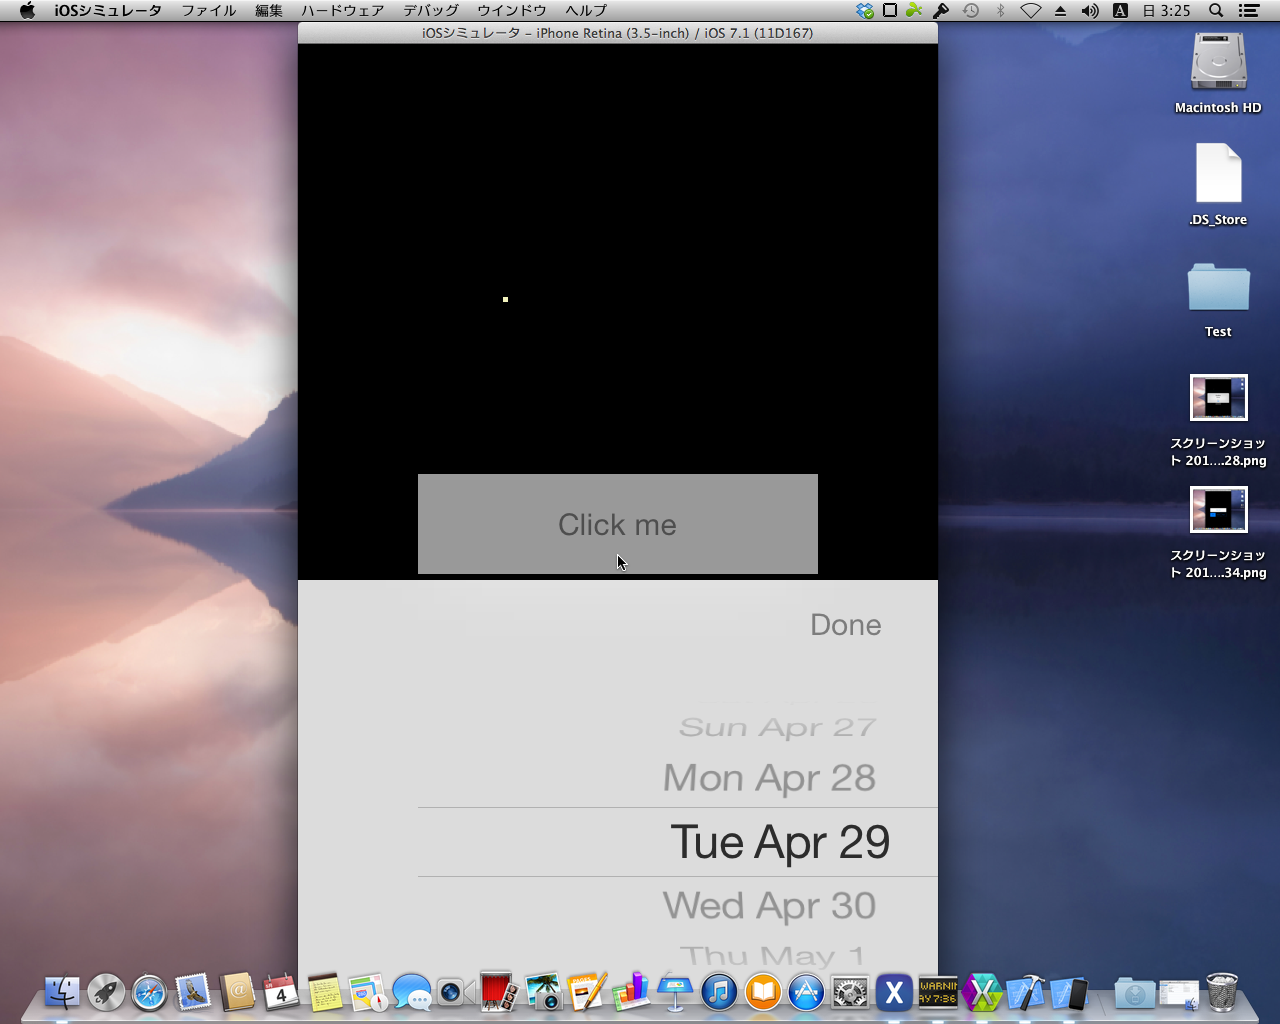
選択後、Doneボタンを押下すると、選択した日付+現在時刻がアラートビューで表示されます。

今回のサンプルはかなり趣が異なっています。
というのもUIDatePickerMonoTouch.UIKit.UIViewController.Viewに表示されるのでは無く、MonoTouch.UIKit.UIActionSheetに表示されています。
UIActionSheetはアクションシートと呼ばれる、ユーザに選択肢を提示するコントロールです。

ある種の別ウィンドウを作成し、そのウィンドウ内にUIDatePickerとUIButtonを追加しています。

3. UIStepper

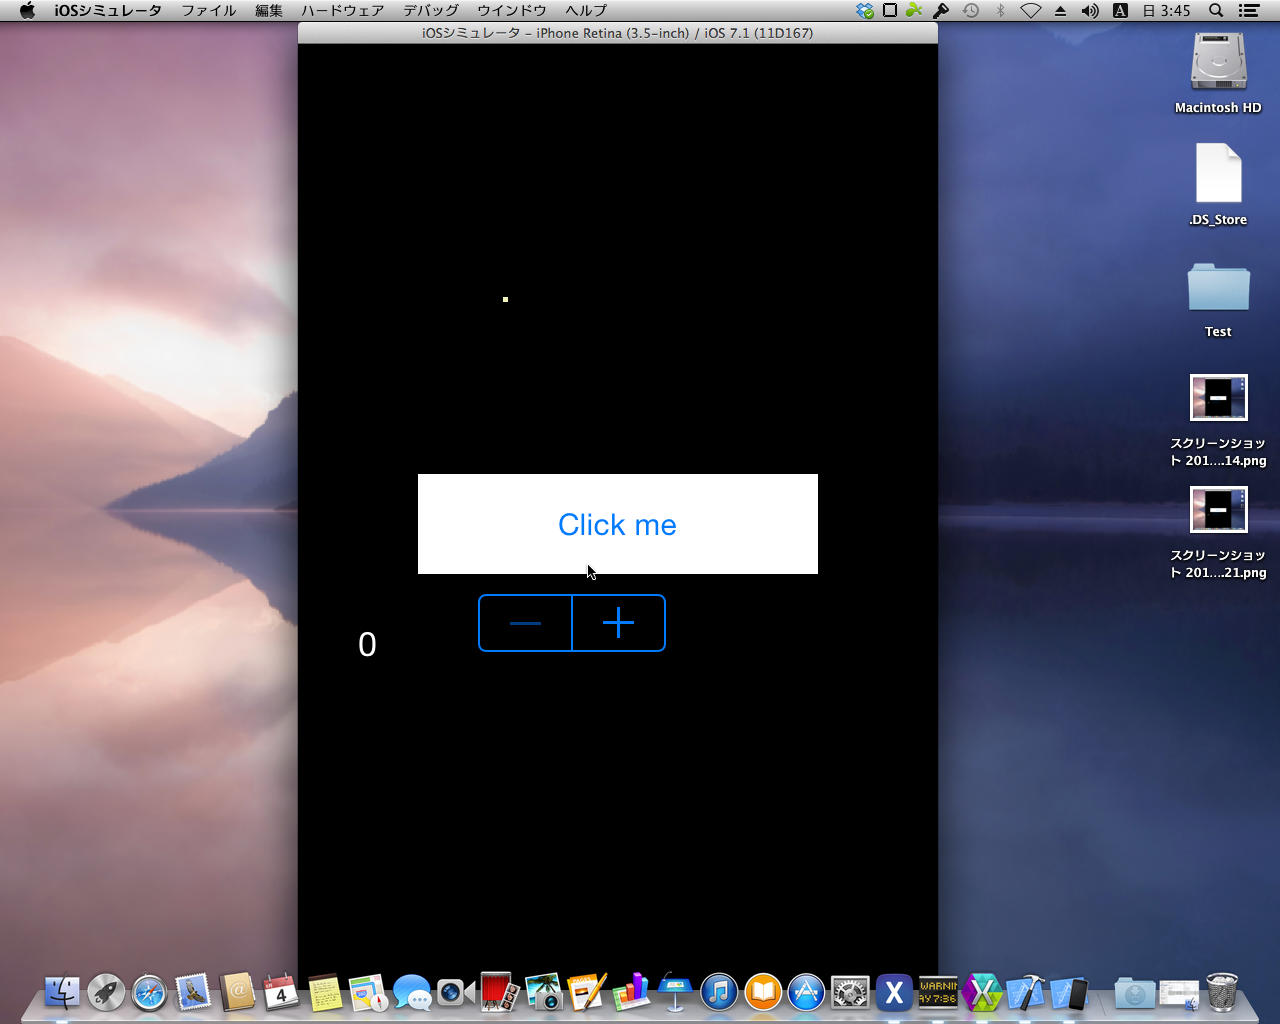
最後はMonoTouch.UIKit.UIStepperを追加します。
これは .NET でいう System.Windows.Forms.NumericUpDownです。
ただし、表示部分は自分で用意する必要があります。

1
2
3
4
5
6
7
8
9
10
11
12
13
14
15
16
17
18
19
20
21
22
23
24
25
26
27
28
29
30
31
32
33
34
35
36
37
38
39
40
41
42
43
44
45
46
47
48
49
50
51
52
53
54
55
56
57
58
59
60
61
62
63
64
65
66
67
68
69
70
71
72
73
74
75
76
77
78
79
public class MyViewController : UIViewController
{
UIButton button;
UILabel label;// ADD
UIStepper stepper; // ADD
int numClicks = 0;
float buttonWidth = 200;
float buttonHeight = 50;

public MyViewController()
{
}

public override void ViewDidLoad()
{
base.ViewDidLoad();

View.Frame = UIScreen.MainScreen.Bounds;
View.BackgroundColor = UIColor.Black; // MOD
View.AutoresizingMask = UIViewAutoresizing.FlexibleWidth | UIViewAutoresizing.FlexibleHeight;

button = UIButton.FromType(UIButtonType.RoundedRect);

button.Frame = new RectangleF(
View.Frame.Width / 2 - buttonWidth / 2,
View.Frame.Height / 2 - buttonHeight / 2,
buttonWidth,
buttonHeight);

button.BackgroundColor = UIColor.White;
button.SetTitle("Click me", UIControlState.Normal);

button.TouchUpInside += (object sender, EventArgs e) =>
{
button.SetTitle(String.Format("clicked {0} times", numClicks++), UIControlState.Normal);
};

button.AutoresizingMask = UIViewAutoresizing.FlexibleWidth | UIViewAutoresizing.FlexibleTopMargin |
UIViewAutoresizing.FlexibleBottomMargin;

View.AddSubview(button);

// ADD
label = new UILabel();

label.Frame = new RectangleF(
30,
button.Frame.Bottom + 10,
50,
buttonHeight);

label.TextColor = UIColor.White;

View.AddSubview(label);

stepper = new UIStepper();

stepper.Frame = new RectangleF(
label.Frame.Right + 10,
button.Frame.Bottom + 10,
buttonWidth,
buttonHeight);

stepper.MaximumValue = 100;
stepper.MinimumValue = 0;
stepper.StepValue = 1;
stepper.Value = 50;

stepper.ValueChanged += (sender, args) =>
{
label.Text = stepper.Value.ToString();
};

label.Text = "50";

View.AddSubview(stepper);
}

}

ビルドするとUIStepperが追加されています。

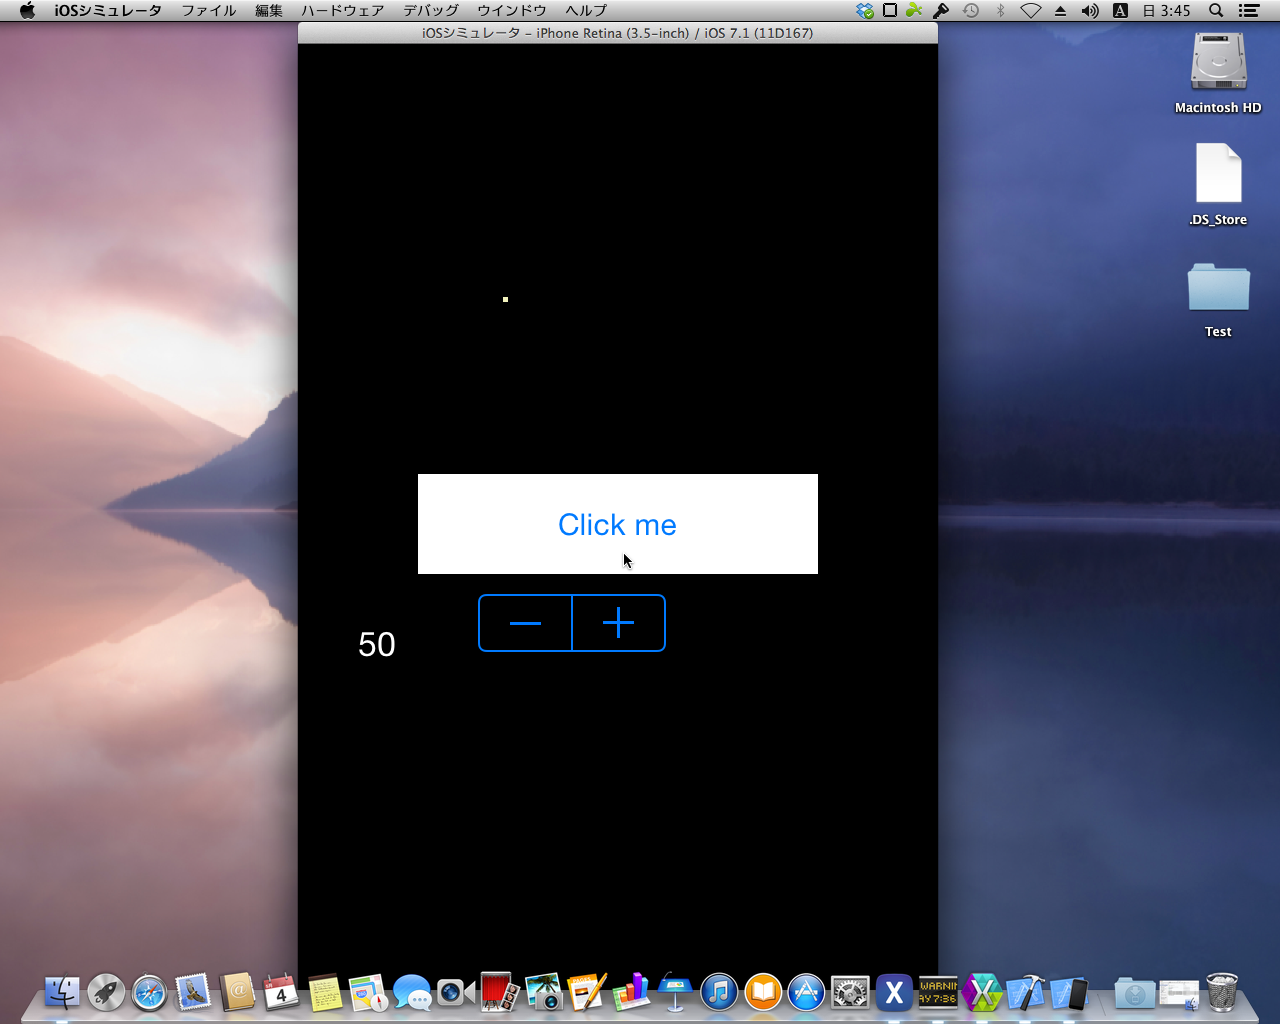
+,-をタップすると、左の数値部分が変化します。

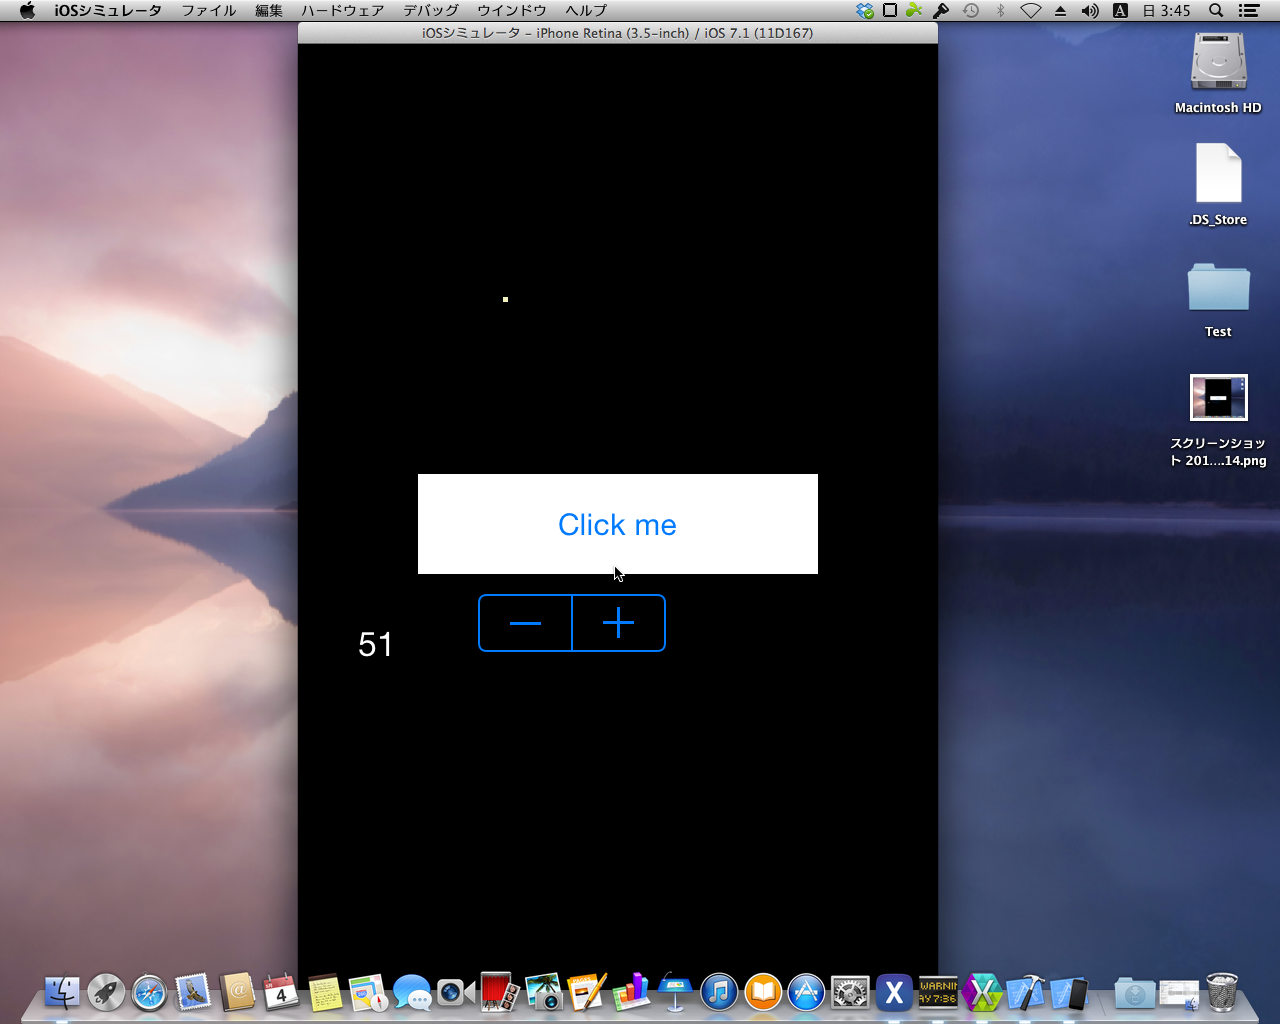
また、タップしたままにすると、数値の変動速度が加速されていきます。
そして、最小値、または最大値に達すると、その側はタップできなくなります。

Conclusion

今回は、

  • System.Windows.Forms.TabControlに対応するMonoTouch.UIKit.UISegmentedControl
  • System.Windows.Forms.MonthCalendarに対応するMonoTouch.UIKit.UIDatePicker
  • System.Windows.Forms.NumericUpDownに対応するMonoTouch.UIKit.UIStepper

を使用しました。
今回も、対応する云々というのは私の偏見ですが、どういうものに似ているか、という認識は取っつきにくさを解消するための方便だと思います。

メインとなるコントロールは次で最後になると思います。